Friday, June 28, 2013

Feline Friday!


This week's Feline Fridays is a special portrait I found off the Interwebs. You could call it Self Portrait of an Artist:


Happy Friday everyone! Because of vacation, I was short on posts this week, but we have got some BIG moves going on in the renovation and I'll post soon.

May your weekend home improvement projects go with no glitches and under budget. When in doubt, add Bud Light.

Thursday, June 27, 2013

Californianspiration

A recent trip to California got me thinking about flowers.  I saw some beautiful blooms while I was away.


Some beautiful color in a backyard


Centerpieces at a friend's wedding
Roses in Coronado. Aren't these so beautiful?!


There is just something so beautiful about flowers and they've given me ideas for the garden!


Friday, June 21, 2013

Feline Fridays!


Have a great weekend! We're off to a much-deserved vacation so no home projects this weekend.

Thursday, June 20, 2013

More Talkin Bout Tile

Continuing my love of tile, let's talk about s

I love subway tile. So when deciding to do the bathrooms and kitchen, I really wanted to look into doing this. I never knew the rabbit hole I had fallen down. There are SO many types of subway tile!

Starting with shape: who knew there were so many different shapes of tile to choose from? 

Beveled
Flat (my favorite)
Hexagonal (eew)
And then once you know your shape, there's so many grout colors!

Classic white

Dark Grey


Light grey! The winner! And my iced coffee which is totally necessary
The next major decision was to decide if the tile should go all the way up to the ceiling, or if it should only go only to the height of about 5 feet. 

All tile

Not all the way up
We decided not to go all the way to the ceiling because I think it looks too sterile. We want to the bathrooms to be modern and relaxing, but cozy.  Although the top 1/3 of the bathroom still needs to be painted, once someone gets me an iced coffee, that will eventually get done.

Wednesday, June 19, 2013

Talkin Bout Tile

There are many things I have not enjoyed about the renovation (I'm lookin' at you, painting) but tile is actually something I have love LOVE LOVED.  

I think floor tile is so much fun because there's instant gratification, unlike basically any other decision you make while renovating. 

For the bathroom, we were originally tempted to do white floor tile. But frankly, it looks seriously dangerous. And hard to keep clean:
Does it come with a housekeeper?

I am already picturing me busting my face

Needless to say, that didn't seem the route to go. A few salespeople suggested doing white with a pattern:
But that looked a bit too easily dated and I didn't love it.

And then, we saw grey tile:
Come to Momma

It looks so beautiful and chic!  

When we were at the flooring store, we saw a couple pick this tile out:

Tile that looks like wood grain. Yum.

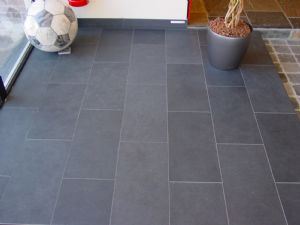
You wouldn't believe how expensive that is!  Maybe for the upstairs bathroom. So we kept looking and eventually found this grey beauty:


And that is what we have installed. It was pretty and practical and couldn't be more happy with it. 

What say you, Internets? Do you also enjoy tile?

Tuesday, June 18, 2013

What IS this?

Well, the garden is still a hot mess: 


But I've enjoyed seeing all the crazy things that have been growing.  Like this guy:
Seriously. What IS this?

That pic was from about a month ago. But then it started to sprout these little purple specks:

 It looks kind of space age.  Its the weirdest plant and I would love to know what it is!

Monday, June 17, 2013

News-y find of the day

BAM is now that much more amazingly awesome:

BAM Harvey Theater now has a huge screen!

Bam and then it hit me.

How Does Your Garden Grow?

Check out these little beauties that bloomed over the weekend. What are they? 


Despite the crazy overgrown weeds, there are some truly beautiful flowers that keep popping up!  In an effort to cut back the mess, I contacted a landscaping company, but they never showed for the Saturday appointment. Oh well, I'll keep looking.

Friday, June 14, 2013

Feline Friday!

Welcome to my favorite part of the week in which I use this space as an excuse to show how adorable my little kitty is. Ya know, besides all the other times there are random cat pictures.

Look at her! She's in drawer!


My goals this weekend are to create a vegetable planer box, pick up my first CSA farm share (hello Brooklyn!), do laundry and unpack my summer clothes.

Everyone have a great weekend full of white wine and may your home projects go exactly as expected with no surprises. I may have just invented a new toast because those are truly the most meaningful words any one person can say to another.

Thursday, June 13, 2013

News-y find of the day

According to the Wall Street Journal, retailers around Barclays are seeing mixed results since the controversial arena/performance space opened.

The most interesting part of the article was that concert-goers spend more locally than basketball fans.

When Good Paint Goes Bad

I still can't believe how expensive getting a professional painter is. While striving to keep things pretty and practical, we decided to paint the place ourselves. Armed with drop clothes, Bud Lights, brushes, rollers, latex gloves, and other necessities of life, we set out to paint.
Bud Light: The unofficial sponsor of Renovation 2013

We completely skipped the step where you have to wipe down the walls. Per the sage advice of my favorite viral video: Ain't nobody got time for that.

We began with the ceiling (did not bother with primer).  One of my Sane Renovation Rules is: Don't let perfect be the enemy of the DONE, so sometimes you just have to do it.  I had never painted a ceiling before, but I had watched a lot of Youtube videos about it, and followed the instructions to paint across the body so you're not hurting your back.  I did my cut-ins first with a brush (a fancy term I learned that means get your booty up on a ladder and hand-paint the corners so you don't mess it up with your roller). I didn't think the ceiling was really that hard. I also really liked the consistency of the ceiling paint. It was nice and thick but easy to move around. I bought the cheapest white I could find at Lowe's:
For the walls, we used one coat and primer and two coats of white paint.  When I bought the primer, I seriously considered buying the paint and primer in one to save time, but decided against it because I didn't want to risk messing this up. I bought a super heavy 5-gallon container of Olympic paint in Antique White.
When the first primer coat dried, and I began to paint Antique White, I had a total and complete freak out because it was clearly NOT WHITE:

Apparently, Antique White is really beige!  Who knew?  Thank god The Yankee was able to take it back to Lowe's and exchange it for true white. He totally saved the day.

While waiting for the paint to be exchanged, I added a second coat to the ceiling drink a Bud Light. The paint was marked "Low VOC" which is supposed to be less chemicals released into the air.  It didn't really smell less offensive than other types of paint.  I won't be buying the Olympic paint brand again because I found the paint to be really difficult to work with. It dried in grey streaks, causing a freak out with every brush stroke. The streaks dried ok enough, but the paint was oddly thin and hard to work with. 

Before:

After:


I'll never stray again from my first love, Benjamin Moore.  I've learned my lesson.

What lessons have you learned in your feeble attempts to cut corners?


Wednesday, June 12, 2013

News-y find of the day

This is cool. And a shoutout to the G train.
Via Brokelyn:
"We all love the subway, even (especially?) the G train. Despite that, we all know that it could use a few improvements, especially since it’s not going to be getting any cheaper anytime soon. Where do you even start though? Designer and all around curious cat Randy Gregory has decided to start all at once, and suggest 100 improvements that he thinks can be made to the subway system, from the stairway lights above to solar panels on outdoor stations, and he’s sharing it on his tumblr, 100 Improvements to the New York Subway."

He's up to #60 today and I couldn't agree more with his tip:

60. Error Messages

When you swipe a metrocard, a green message appears on the lcd screen, and a beep goes off. Every time. Even if you miss-swipe, your card is out of money/time. It’d be better if a different light showed, or if a different sound played.

Cheap + Cheerful: Countertops

In my previous post describing how we DIY'd (yeah, that's a verb now) the kitchen cabinets, you may be wondering how we decided up on that glorious butcher block countertop.
Well, the pre-renovation budget (in which we had unicorns and sparkly dreams) allowed for marble countertops.  Since we wanted this kitchen to be a crowd-pleaser, we thought we would do a light marble slab.  The size of the countertop is not large (around 6 feet by 2 feet) so its really not THAT bad a budget hit.

Needless to say, the budget for the countertop was cut to basically $0 so that's when we decided to get creative (aka Cheap + Cheerful!) and resort to checking out IKEA butcher block countertops.
NUMERAR in Oak

You can buy them in various sizes and finishes. We chose Oak, a nice medium shade with a pretty traditional edge. I found this countertop just now and kinda wish we had done this one, which I definitely don't remember seeing at IKEA, possibly because IKEA is so disorienting:


Anyway, we had it cut to fit and installed in place of the white plastic business that was formerly there:

So far, I really like it. Its not that easy to keep clean though, and I have already make cut marks into it accidentally with knives. You can make it more personal by having a custom edge cut into the sides although its not my style (a bit too traditional, I think) but it would be a good way to set yourself apart from every other IKEA butcher block:
Image via Apartment Therapy

Other blogs I have read, including House Tweaking recommend a mineral oil treatment to keep it glossy and clean. That seems a little too much work for me personally, because I have a very demanding kitty and there's white wine to drink, y'all. 

Have you ever used IKEA in a pinch? What were your results?

Tuesday, June 11, 2013

DIY Kitchen Cabinet Remake

Being from the South, you know I love me some bright and white kitchen cabinetry.

Come to Mama. I would totally wear that top too.

So needless to say, THIS wasn't cutting it:

The pre-renovation budget totally allowed for shiny new cabinetry, unicorns and dreams. And then we started the work, and said buh-bye to all that!

So I had to get creative. Inspired by Young House Love's instructions for how to paint your cabinetry, I decided that this would be the way to go.  I couldn't find a project tutorial that was exactly like the one I was undertaking, so really this was an exercise in DIY optimism. Most tutorials show cabinets going from really dark to really light, include hardware, and don't account for this two-tone trim business that we had. Plus, I knew we were painting MDF plywood (aka particle board), not real wood which is another factor to take in. 

The Yankee removed the cabinet fronts and labeled them on the back so he would be able to put each front back where it belonged. 
I wonder how many Nike Fuel Points he earned as a result of this project.

I wiped down every surface with a rag drank a Bud Light while dragging the fronts outside. There, I propped them along the fence and on cement blocks on plastic painter's drop cloths to protect the brick underneath from paint. Of course I ended up getting paint on the brick. Did some research and it looks like this aptly-named Goof Off remover will remove it.  I started by very lightly sanding the front panels and the base. Then used an oil-based primer to put a thin coat of primer on both the brown trim and the panels themselves. The panels had a slight grain fake texture to them, so I used a high-quality brush following the grain.


I put two very thin coats of Olympic paint in Snow Storm in Satin finish. From what I was reading on the Internets, you want to avoid glossy finishes that will show mistakes more.  Snow Storm is white, but it has just the slightest tinge of grey. I thought this would avoid looking too stark against the white wall:

In the meantime, we primed and painted the bases of the cabinets which was a huge pain because due to the timing of the painting and flooring, we could only do this project until after the butcher block countertop had already been installed! So we had to cover up the countertop and attempt to attach painter's tape around the edge which wouldn't stick for anything.  Luckily, we only ended up getting paint in the sink and not on the countertop!  We used painter's tape to protect the inside edges of the cabinets, and just basically prayed that  we wouldn't get paint anywhere else. At least that worked!

We let it dry overnight, and voila:
Much better!

The only issue we have with them is that because there's no hardware, the cabinets themselves are slightly tacky/sticky when opening and closing. I also didn't want to bother with the back of the doors, and thought I could just be really careful painting the fronts. There are some drips on some of the cabinets backs. I am sure some hardware and painting the backs would greatly help, but y'all, I am exhausted and there's white wine to drink.

We are still planning a fun project for the unpainted backsplash - more to come. We also need to get covers for the light switches and generally organize things. I am beginning to find that home ownership is a never-ending to-do list.

Have you ever had a project work out really well? Or more interestingly, be a total disaster?